

Most laptops built in the last decade have a small camera above the screen, but that doesn’t mean using it is always obvious. If you’ve ever opened your laptop planning to snap a picture and instead stared at a blank app or a frozen preview window, you’re not alone. Knowing how to click photo from laptop hardware correctly saves time and avoids the trial-and-error that sends people searching for third-party apps they don’t actually need.
This guide walks through five practical methods that work across Windows and Mac laptops, including specific notes for Lenovo and HP models, plus what to do if you want a photo without pressing any button at all.
How to Click Photo from Laptop Using the Built-In Camera App
Every modern laptop ships with a default camera application, and this is almost always the fastest route. Windows machines include an app simply called Camera, while Mac laptops use Photo Booth. Neither requires installation, and both access the same physical webcam that powers your video calls. Before trying anything more advanced, it’s worth confirming this built-in tool works, since it resolves the request in under a minute for the vast majority of users.
Method 1: Using the Windows Camera App
On Windows 11 and Windows 10, open the Start menu, type “Camera,” and press Enter. The app opens directly to a live preview of your webcam.
To take a photo:
- Confirm the app is set to photo mode rather than video mode (there’s a toggle on the side of the window).
- Click the white capture button, or press the physical camera-shutter key if your keyboard has one.
- The image saves automatically to the Camera Roll folder inside Pictures.
To find the Camera app on Windows, select Start and then Camera, and once it’s open, select Photo or Video and select it again to take a picture or start recording. This process is identical whether you’re on how to take a photo from a laptop camera in Windows 11 or the slightly older Windows 10 layout, though Windows 11’s interface groups the settings gear into a cleaner side panel. Microsoft Learn
On Windows 7, the dedicated Camera app doesn’t exist. Instead, older laptops typically rely on a manufacturer-installed webcam utility (often listed as “Webcam” or a brand-specific name in the Start menu), or you can use a video-calling app like Skype to grab a still frame from the live feed.
Method 2: Using Photo Booth on Mac Laptops
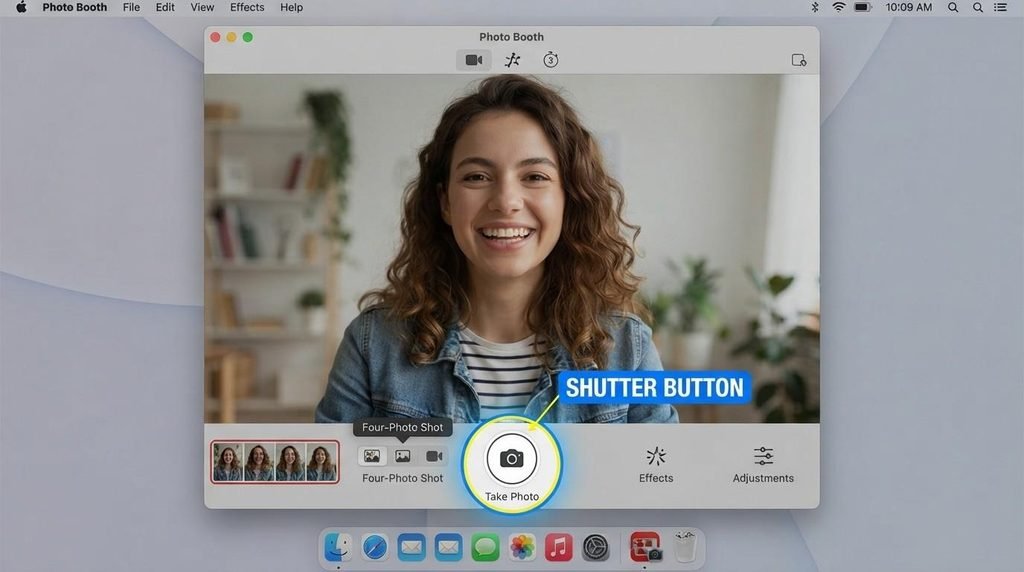
MacBook users can click a photo from the laptop hardware through Photo Booth, which comes preinstalled. Open Spotlight (Command + Space), type “Photo Booth,” and launch it.
In the Photo Booth app, check that the Take Photo button is available, and in the bottom left of the window, click the Picture button to take a single photo or the Four Pictures button for a sequence of four. Clicking the shutter button captures the image immediately, though there’s normally a short three-second countdown by default. Photos land in a separate Photo Booth library rather than the main Photos app, so check there first if you can’t locate a recent shot. Apple.
Method 3: Capturing a Photo from Lenovo or HP Laptop Cameras
Brand-specific software sometimes complicates an otherwise simple task. On a Lenovo laptop, the physical webcam is still accessed through the standard Windows Camera app in most cases, though some ThinkPad and IdeaPad models include a Lenovo Vantage utility with its own camera privacy toggle that must be switched on first. If the camera app shows a black screen, check Lenovo Vantage or the camera shutter switch (a small physical slider next to the lens on many models) before assuming the hardware is broken.
Learning how to click a picture with an HP laptop camera follows the same Windows Camera app process, but HP laptops commonly include a function-key shortcut (often F9 or a camera icon) that enables or disables the webcam at the hardware level. If the picture won’t take, that key combination is usually the first thing worth checking. HP’s own community support pages walk through this camera-enable step in detail for specific model lines.
Method 4: Taking a Photo of Your Computer Screen Instead of Yourself
Not every search behind this keyword is about the webcam. Some readers actually want to know how to take a photo on a computer screen—meaning a screenshot of what’s displayed, not a picture of themselves. On Windows, pressing the Windows key + Shift + S opens a snipping tool that lets you select any area of the screen and copy it as an image. On Mac, Command + Shift + 4 does the same, letting you drag a selection box around whatever you want to capture. This is a completely separate function from the webcam and is worth clarifying, since the two get confused often in casual conversation.
Method 5: Selecting an Existing Photo Already Saved on Your Laptop
If the goal isn’t capturing a new picture but instead answering “how do I select a photo on my laptop?” the process is simpler than expected. Open File Explorer (Windows) or Finder (Mac), navigate to the Pictures folder, and click once on any image to select it — or hold Ctrl (Windows) or Command (Mac) while clicking to select multiple files at once. From there, the photo can be attached to an email, uploaded to a website, or dragged directly into another application.
How to Click a Photo Without Touching the Screen
A common follow-up question is how to click a photo without touching the screen, usually asked by people who don’t want fingerprints on a touchscreen laptop or who are positioning the camera from a distance. The built-in timer feature in both the Windows Camera app and Photo Booth solves this directly. In Windows Camera, the Settings menu includes a Photo Timer option with 2, 5, or 10-second delays. In Photo Booth, holding the Option key while clicking the shutter adjusts timing behavior as well. Once the timer is set, the picture is taken automatically without needing to touch the trackpad, keyboard, or screen at the moment of capture. A wireless mouse or a keyboard shortcut assigned to the capture button works equally well for the same purpose.
Common Problems When You Try to Click Photo from Laptop
A few recurring issues account for most of the frustration people report:
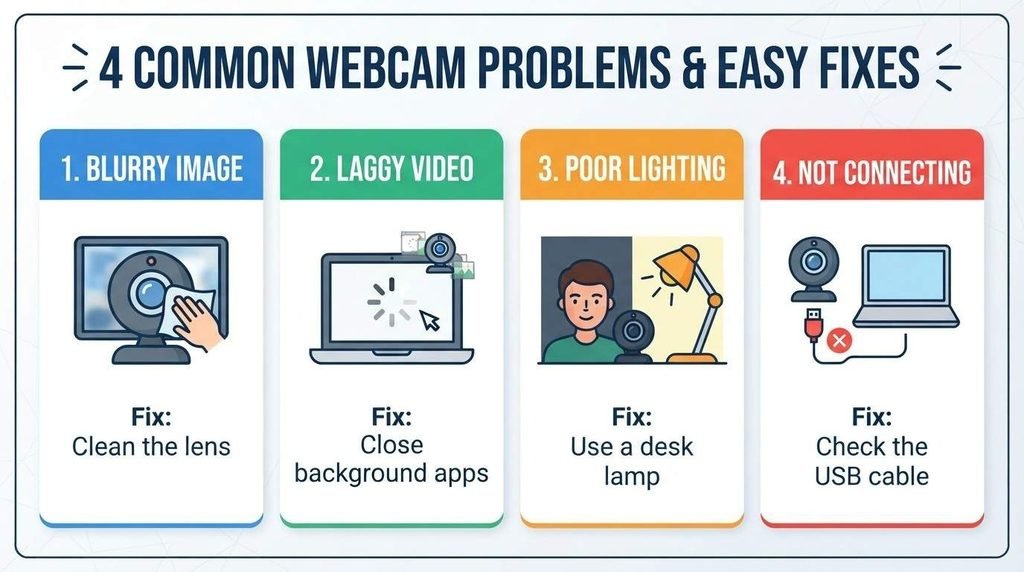
- Black or frozen preview: Usually caused by another app (like a video conferencing tool) already using the webcam. Closing background apps typically resolves it.
- Camera not detected: Often tied to a disabled privacy setting. On Windows, checking Settings > Privacy & Security > Camera confirms the app has permission. On Mac, System Settings > Privacy & Security > Camera controls the same thing.
- Photos saving somewhere unexpected: Both the Windows Camera app and Photo Booth use dedicated default folders rather than the general Pictures library, which is why saved images sometimes seem to disappear.
- Physical shutter switches: Many business laptops, including several Lenovo and HP lines, include a manual privacy slider that physically blocks the lens—an easy detail to overlook.
Best Practices for Better Laptop Camera Photos
Webcam hardware is generally lower resolution than a phone camera, so a few adjustments make a noticeable difference. Positioning the laptop so a window or lamp faces you rather than sits behind you avoids the washed-out silhouette effect common in built-in webcams. Cleaning the lens with a soft cloth also matters more than most people expect, since a laptop that travels in a bag collects dust and smudges directly over the camera opening. If picture quality still feels limited for regular use — video calls, streaming, or content creation — it’s worth keeping your laptop’s camera and other hardware components properly maintained as part of routine upkeep, since dust buildup and outdated drivers are frequent, overlooked causes of blurry or dark photos.
For anyone whose laptop camera consistently underperforms regardless of settings, choosing a laptop with a stronger built-in webcam is a more permanent fix than adjusting software repeatedly.
FAQs
How to click a photo with a laptop?
Open the built-in Camera app (Windows) or Photo Booth (Mac), confirm the preview is live, and press the capture button. This is the fastest way to click a photo from a laptop’s hardware without installing anything extra.
How to click a photo without touching the screen?
Use the built-in photo timer in the Camera app or Photo Booth, or connect a wireless mouse or keyboard shortcut to trigger the shutter remotely.
How can I click my photo?
Position yourself in front of the webcam preview, make sure the lighting faces you rather than sits behind you, and press the capture button in the Camera or Photo Booth app.
How do I select a photo on my laptop?
Open File Explorer or Finder, go to the Pictures folder, and click the image once to select it, or hold Ctrl/Command to select several files at once.
How do I take a photo from my laptop camera in Windows 11?
Search for “Camera” from the Start menu, confirm photo mode is active, and click the capture button. The image saves automatically to the Camera Roll folder.
Why does my Lenovo or HP laptop camera not turn on?
Check for a physical shutter switch near the lens, a function-key toggle (common on HP models), or a privacy setting inside Lenovo Vantage or Windows Settings that may be blocking access.
Is there a difference between taking a photo and taking a screenshot on a laptop?
Yes. A photo uses the physical webcam to capture what’s in front of the laptop, while a screenshot captures what’s displayed on the screen itself, using a separate keyboard shortcut.
Conclusion
Taking a picture with a laptop camera comes down to knowing which built-in app your operating system already provides, since Windows Camera and Photo Booth handle nearly every common scenario without extra software. Whether the goal is a quick profile photo, a hands-free shot using the timer, or troubleshooting a Lenovo or HP privacy switch that’s blocking the lens, the process to click photo from laptop hardware stays largely the same across devices. Start with the default camera app, check privacy and hardware switches if the preview looks blank, and adjust lighting for a noticeably sharper result.